


Run your renovation like a project: set up one shared hub with Files, Tasks, and Budget, plus a dated decision log with IDs, owners, and written sign-offs. Save plans, permits, specs, and revisions in a master folder with consistent file names, and link inspiration to drawing callouts. Build a calendar with milestones, lead-time deadlines, and inspections. Track estimates vs. actuals, receipts, change orders, deliveries, and returns (with photos and RMAs). Keep tool zones, dust control, and safety checklists—and you’ll be set up for what comes next.
Key Takeaways
- Create a single renovation hub for files, tasks, budget, and decision logs, with consistent naming and archived revisions.
- Build a milestone-based schedule with owners and dependencies, and update progress daily to spot slips early.
- Track estimates, committed costs, actual spending, and change orders in one budget sheet; review weekly and flag overruns fast.
- Plan and track deliveries and returns with ETAs, order numbers, photos on arrival, RMAs, and weekly refund reconciliation.
- Run an organized site with dust control, labeled storage zones, tool stations, safety protocols, and regular HVAC filter replacements.
Set Up a Renovation Hub (Files, Tasks, Budget)

Before the dust starts flying, set up a single renovation hub where every document, decision, and dollar gets captured in one place. Pick one tool you’ll actually use (spreadsheet, notes app, or project board) and name it the source of truth.
Create three sections: Files, Tasks, Budget.
In Tasks, list workstreams (demo, framing, electrical) with owners, due dates, and dependencies so you don’t schedule paint before drywall.
In Budget, track estimates, committed costs, and actuals, plus a contingency line you won’t touch without approval.
Add a running change log: what changed, why, cost impact, and decision date.
Keep Design inspiration links and screenshots with notes, and log material sourcing options with lead times, alternates, and order status.
Review weekly.
Store Plans, Drawings, and Permits in One Place
Even if your contractor keeps a copy, you’ll save time and prevent mistakes by storing every plan set, drawing revision, and permit in one clearly labeled location. Create one master folder (digital plus a slim binder) with tabs: Site Plan, Floor Plans, Elevations, MEP, Structural, Permits, Inspections, Change Logs.
Name files consistently (YYYY-MM-DD_Room_Version) and archive superseded drawings so you never build from the wrong set. Keep a printed “current” sheet on-site for quick checks.
Add a section for Design inspiration images and notes, but link each idea to the exact drawing callout it affects.
For Material sourcing, attach spec sheets and finish schedules to the relevant plan page, and mark lead times beside permit deadlines. Update it weekly.
Organise Quotes, Contracts, and Warranties
Centralise every quote and contract in one folder (digital or physical) and label each file by trade, date, and scope so you can compare and approve fast.
Track key terms—price, inclusions, exclusions, payment stages, and change-order rules—on a single summary sheet you update after every revision.
Log warranties with start dates, coverage details, and expiry deadlines, then set calendar reminders so you don’t miss claims or final inspections.
Centralise Quotes And Contracts
Once the quotes start coming in, you’ll lose time (and leverage) if they’re scattered across emails, texts, and paper folders. Create one “Renovation Admin” hub: a cloud folder plus a single spreadsheet index. Name files consistently: Trade_Room_Date_Version (e.g., Plumbing_Kitchen_2026-07-08_v2). Save every quote as PDF, plus original attachments, and link them in your index.
Add columns for scope notes, exclusions, allowances, and proposed start dates so you can compare apples to apples.
Before you sign anything, store the final contract beside the accepted quote, drawings, and specs. Attach your design inspiration and material selection references to that trade’s folder, so changes don’t get “lost” in conversation.
Keep one running “Questions/Variations” document per contractor, dated and shared.
Track Warranties And Deadlines
With your quotes and signed contracts filed in one place, set up a parallel system to track warranties and time-sensitive deadlines so nothing expires unnoticed. Create a simple log (spreadsheet or notes app) with columns for item, installer, serial number, warranty length, start date, end date, and claim steps. Attach PDFs/photos of receipts, compliance certificates, and product cards.
For deadline tracking, add key dates: progress payment due dates, inspection bookings, defect-liability end dates, council sign-offs, and maintenance intervals (sealant recheck, filter changes). Set calendar reminders at 90/30/7 days before expiry, plus a task to confirm paperwork is complete.
When something changes, update the log the same day. This Warranty management routine prevents missed claims and avoids costly rework later.
Track Your Renovation Budget and Receipts
Although renovation costs can shift day to day, you’ll stay in control if you track every expense and receipt as it happens. Set up a simple spreadsheet or budgeting app with categories (demolition, plumbing, fixtures, permits) and a running total against your target budget.
Create a receipt workflow: snap a photo immediately, name the file by date-vendor-amount, and store it in cloud folders that match your categories. Log payment method, tax, and whether the item’s returnable.
For material sourcing, record unit prices, delivery fees, and lead-time penalties so you can compare suppliers accurately. For contractor communication, confirm change orders in writing and attach invoices to the same line item.
Review entries weekly, flag overruns early, and keep a dedicated folder for reimbursements and rebates.
Build a Renovation Calendar With Key Milestones
Before the first wall comes down, build a renovation calendar that turns your scope into dated, trackable milestones. Start with a backward plan from your target move-in date, then block phases: design, demo, rough-ins, inspections, drywall, finishes, and punch list.
Assign start/end dates, buffer days, and dependencies so you know what must finish before the next task begins.
Add checkpoints for Design inspiration decisions and approvals, then lock Material selection deadlines for long-lead items like cabinets, tile, windows, and appliances.
Schedule measurement days, order dates, delivery windows, and acclimation time for flooring.
Include recurring reminders for permit milestones, site-clean days, and weekly progress reviews.
Keep the calendar visible, update it daily, and log any slips with a new forecast date.
Create a Contact List for Every Trade and Supplier
Create one centralised contact log for every trade so you’re not hunting through emails when something changes on site. Record names, roles, phone numbers, email addresses, and preferred contact times. Then link each entry to the relevant milestone in your calendar.
Add supplier details, order numbers, and lead times so you can confirm deliveries early and prevent schedule gaps.
Centralised Trade Contact Log
Once multiple trades and suppliers start cycling through your renovation, you’ll save time (and prevent mistakes) by keeping one central contact log instead of scattered texts, emails, and paper notes. Build a single spreadsheet or notes page and share it with anyone helping you manage the site.
For each trade, record company name, main contact, role, phone, email, preferred contact method, and best calling hours. Add backup contacts, plus your job address and a short scope tag (e.g., “rough-in plumbing”) so you don’t confuse similar crews.
Include fields for last contact date, next action, and open questions to tighten Trade communication. When schedules shift, your log supports faster contractor coordination because you can notify the right person immediately and track who confirmed.
Supplier Details And Lead Times
Even if your trade list looks solid, supplier lead times can derail the entire schedule if you don’t track them as carefully as labour.
Build a supplier contact sheet for every product line: timber, tile, fixtures, glazing, appliances, paint. Log company name, rep, phone, email, account number, order method, delivery days, and site access notes.
Do supplier research before you lock selections: confirm stock status, minimum order quantities, returns policy, and whether items ship from local warehouses or overseas.
For lead time management, record quote date, order date, promised dispatch, confirmed delivery, and any dependencies (e.g., cabinets before benchtops).
Set reminders one week before dispatch and 48 hours before delivery, then call to reconfirm.
Keep proof of payment and delivery dockets in the same folder.
Log Decisions, Selections, and Change Approvals
Because renovation timelines move fast and details slip easily, you’ll stay in control by keeping a single, dated log of every decision, product selection, and change approval. Use one spreadsheet or notebook, and assign each entry an ID, room, category, and owner.
Attach your Design inspiration links and note Material preferences (finish, sheen, edge, grout colour) beside the chosen option, plus price and supplier.
When a change comes up, record what triggered it, the options reviewed, and the final call. Write the impact on budget and schedule, then get written sign-off from you and your builder before work proceeds.
Snapshot the log weekly, and share it after site meetings so everyone builds from the same, current decisions only.
Manage Deliveries, Returns, and Storage
You’ll stay on schedule when you plan deliveries in advance and track each order’s ETA, contact, and inspection status in one list.
You’ll cut down rework by setting a tight returns workflow—photos on arrival, keep packaging, log RMA numbers, and confirm refunds against receipts.
You’ll also protect materials by assigning labeled storage zones on-site, using an inventory count, and keeping high-value or fragile items secured and accessible.
Schedule And Track Deliveries
Once your renovation schedule starts moving, deliveries can quickly become the critical path if you don’t manage them with the same discipline as the trades. Set up delivery scheduling by trade sequence: rough-in, close-up, finishes, then fixtures. Confirm lead times in writing, book delivery windows, and add buffer days for damage checks and re-staging.
Use a single spreadsheet or app for tracking logistics: supplier, order number, ETA, carrier contact, site access notes, and who’s signing.
Send site rules to suppliers: parking, gate codes, elevator bookings, and delivery hours. Assign one delivery captain and a backup. Walk the site before arrival, clear paths, and label drop zones by room to prevent double-handling and theft.
Streamline Returns And Refunds
Even if every delivery lands on time, returns and refunds can still blow up your schedule and budget if you don’t run them like a process. Before you buy, confirm Return policies in writing, including time windows, restocking fees, and who pays return shipping. Save product links, SKU numbers, and receipts in one folder so you can file claims fast.
When an item’s wrong or damaged, photograph it immediately, keep all packaging, and log the issue the same day. Open a return request within 24 hours, note the RMA number, and book pickup or drop-off with a deadline. Track refund procedures: expected processing days, refund method, and credit memos for contractor accounts.
Reconcile refunds weekly against your budget and flag anything overdue.
Organize On-Site Storage
Three zones keep renovation materials from turning your home into a bottleneck: receiving, quarantine/returns, and active-use storage. Mark each with tape and signage, then assign a handler (you or a lead) to enforce the flow.
In receiving, stage deliveries on pallets or a folding table, check counts, and photograph labels. Move damaged or wrong items straight into quarantine/returns with an RMA sheet, return packaging, and a dated tag. In active-use storage, keep only this week’s materials, sorted by trade and room. Use Creative storage solutions like vertical rack carts, rolling bins, and ceiling hooks. Add innovative organizational tools—QR-labeled totes, color-coded lids, and a simple inventory list—so anyone can find, restock, or flag shortages fast.
Set Up Dust Control, Tool Zones, and Safety Rules
Before demolition dust and half-finished rooms start bleeding into the rest of the house, set clear controls for where air, tools, and people can—and can’t—go. Hang 6-mil plastic at doorways, tape seams, and add a zipper entry. Run a box fan exhausting outdoors, and replace HVAC filters weekly for dust mitigation. Lay sticky mats at exits and vacuum with a HEPA unit daily.
Next, create tool zones: one bench for cutting, one for fasteners, and a labeled charging station. Mark lanes with tape so cords don’t cross walk paths. Store blades, chemicals, and nails in lidded bins.
Post safety protocols on the door: PPE required, power-off lockout, kid/pet exclusion, and end-of-day sweep and count.
Set Up Temporary Living Zones (Kitchen, Bath, Work)
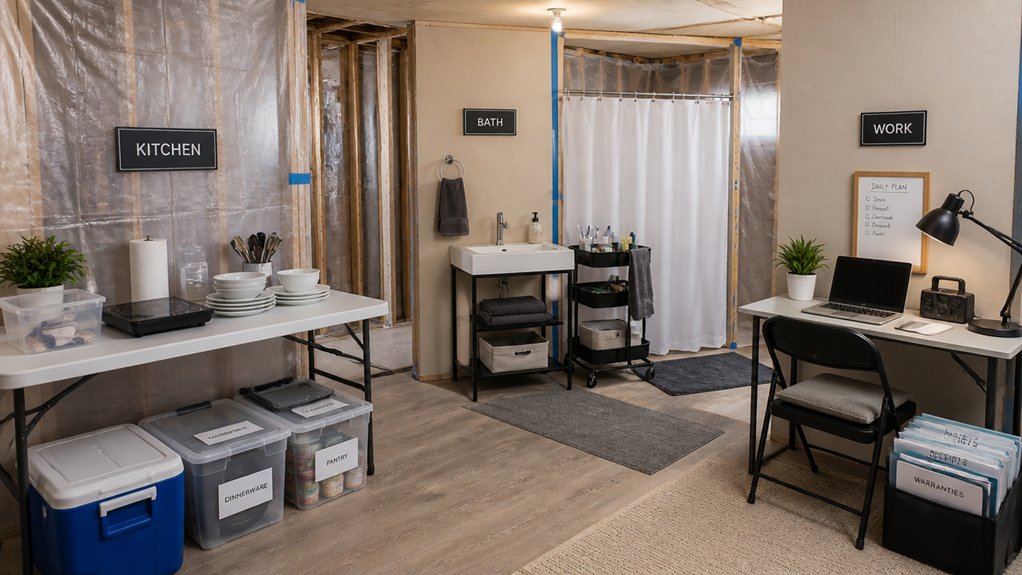
Once you lose a functioning kitchen or bath, small daily tasks can derail your schedule unless you set up temporary living zones in advance. Pick one low-traffic room and map three stations: food, hygiene, and work.
For the kitchen zone, use a folding table, microwave, kettle, and dish tub; store essentials in labeled bins and keep a daily “reset” checklist.
For the bath zone, hang caddies, stock spare towels, and set a waterproof basket for toiletries; agree on cleaning cadence.
For a work zone, place your laptop, chargers, plans, and a tray for samples. Capture Design inspiration on a single board, and track Material sourcing in a shared list so deliveries go to the right zone.
Keep pathways clear and lighting reliable.
Do a Final Checklist Before Handover and Payment
As the renovation wraps up, run a final, room-by-room checklist so you only sign handover documents and release the last payment after everything matches the scope.
Start with safety and function: test smoke alarms, switches, outlets, taps, toilets, HVAC, and appliances. Open and close every door, drawer, and window; check locks, seals, and alignment.
Inspect paint, caulk lines, tile grout, flooring handovers, and trim for gaps, chips, or overspray. Confirm finishes match selections and quantities match invoices.
During the Final inspection, photograph defects, note locations, and set a written punch-list with deadlines.
Collect warranties, manuals, compliance certificates, and as-built plans.
In the Payment process, hold retention or the final draw until punch-list items are signed off in writing.
Conclusion
When the renovation gets noisy, you’ll stay calm by staying organised. Keep your hub updated, keep your paperwork sorted, keep your budget reconciled. Mark milestones, confirm deliveries, document changes. Control dust, control tools, control access. Set up living zones, set up routines, set up clear safety rules. Then you’ll finish strong: walk the site, test every system, check every warranty, photograph every detail, and only then sign off and release final payment.